Do-it-yourself wood carving paintings. Features of contour wood carving. Trees and flowers
Wood carving is an ancient art form. Its high popularity to this day is explained by the availability of the material and the beauty of the result. The primitive designs that can be found in the works of our ancestors over time turned into elegant patterns and ornaments. Thanks to the power of the Internet, finding sketches for wood carving is not particularly difficult.

What is an ornament
Since ancient times, various ornaments have been used to decorate wood products. The ornament is a special rhythmically arranged pattern made of various visual elements.

There are several main, basic varieties of ornament. Let's look at some types in more detail.
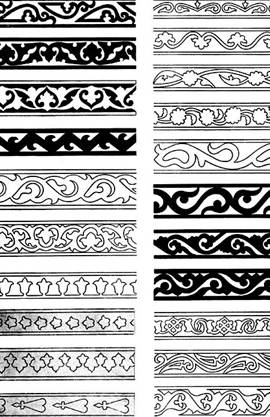
Geometric ornament
A geometric pattern, as a rule, consists of many simple figures, the combination of which creates an amazing fantasy image.

Individual elements of geometric patterns can be used independently:
- dot (together acquires a decorative effect);
- lines (used as delimiters of individual scenes on the product);
- broken lines (carry a sacred meaning, for example, a zigzag is a symbol of water);
- squares and diamonds (act as frames for plots);
- polygons (traditional patterns of oriental motifs);
- crosses (in ancient times - symbols of various structures);
- spirals, screws;
- circles.

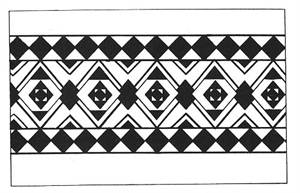
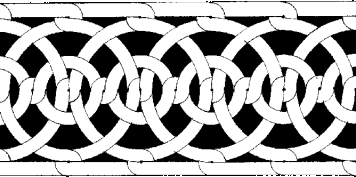
The geometric ornament will be most widespread in geometric and contour carvings.
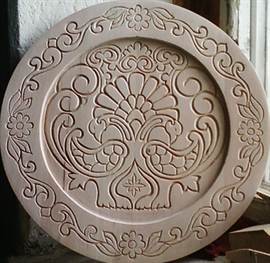
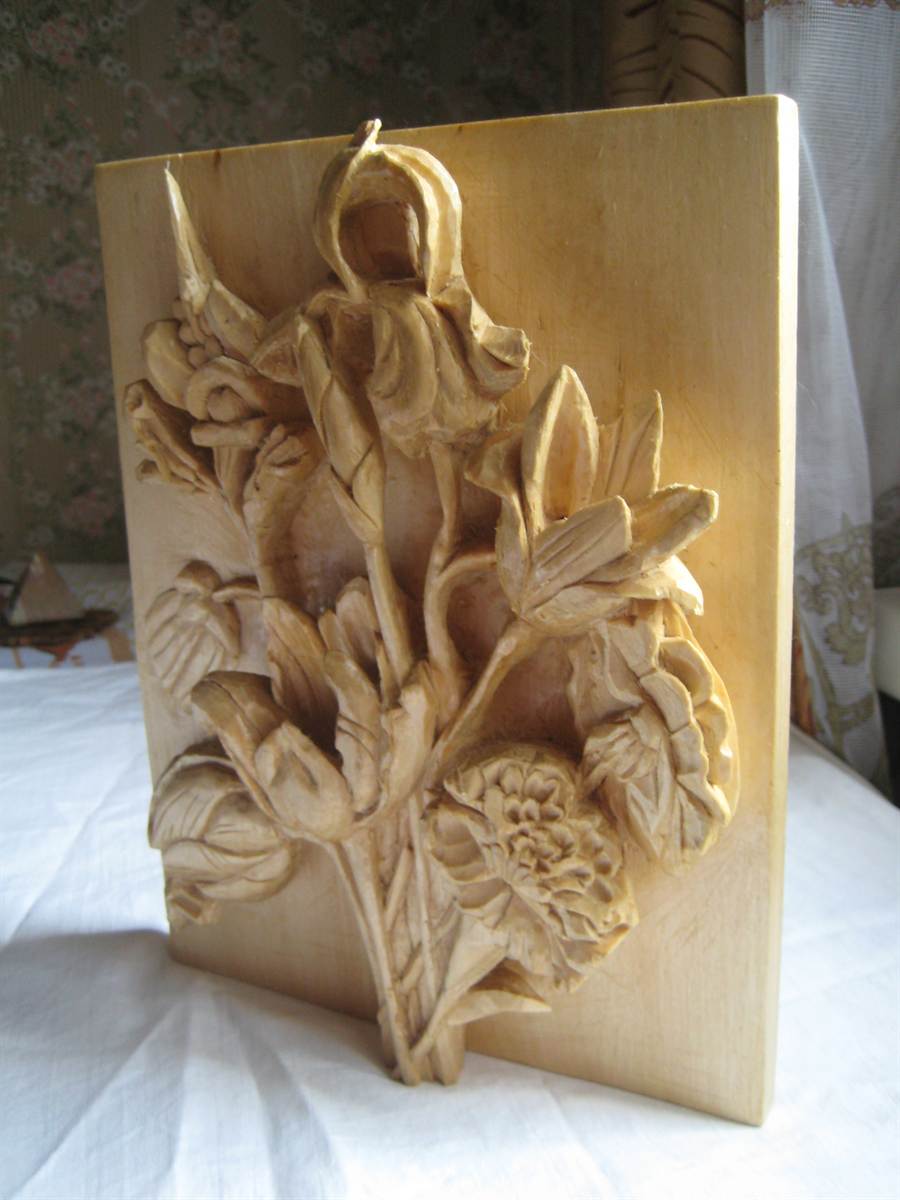
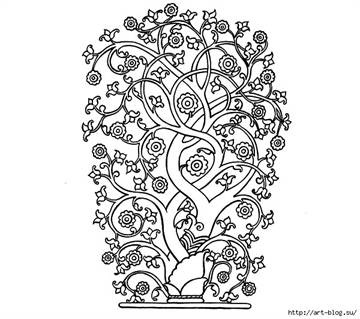
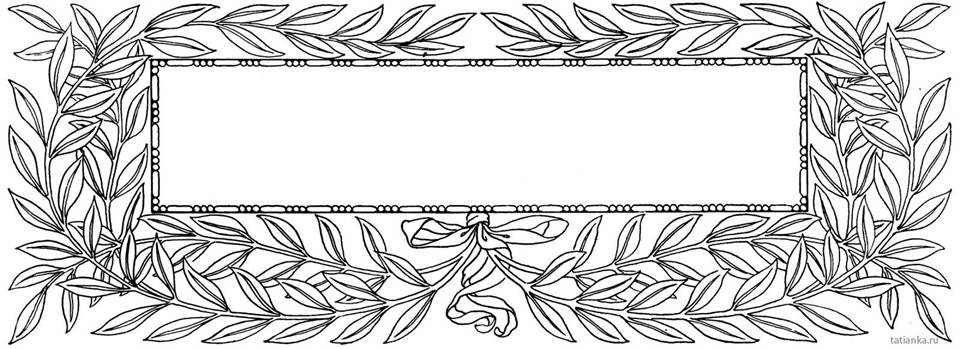
Trees and flowers
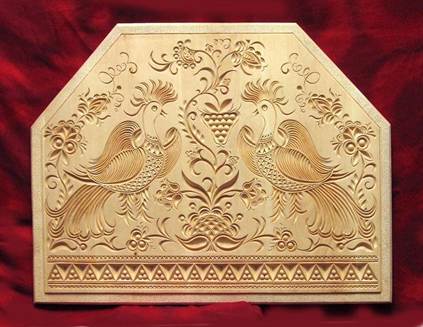
They border the main ornament of the composition, or are independent ornaments. Trees, flowers, and fruit-bearing plants are depicted. It is one of the most favorite ornaments of different nations.
The most common forms are lotus, ivy, grapes, oak.


Wild animals
As the name suggests, zoomorphic ornament is based on the repetition of images of different animals. Most often, their appearance is greatly simplified. Animals are often associated with mythology.

Used in combination with floral and geometric patterns.


It is found in any type of carving (from flat-relief to sculptural).
Image of a person
As a rule, a person in wood carving is depicted schematically, along with plant and animal ornaments.

Complex ornaments
A wide variety of elements that have a decorative function (inscriptions, hieroglyphs, Arabic script, heraldry, symbols).

Depending on the location and shape of the ornament, The following varieties are distinguished:
- border;
- garland (wavy ornament);
- rosette (a separate ornamental figure);
- palmette (fan-shaped ornament);
- arabesque (complex, ornate ornament);
- wreath;
- panel
Stages in preparation
Before cutting out the design you like, you need to find a sketch of it. Then you will need to cut out the templates.

Next, transfer it to the workpiece using carbon paper (tracing paper) and a simple pencil. And only then will it be time to cut out the ornament (with a knife, jigsaw, milling cutter or other suitable tools).
Beginners should not attempt complex, ornate designs. Contour carving and artistic motifs are good for beginners.


The template must be suitable for the specific type of thread. There are some templates for flat-relief and geometric carvings, and others for slotted carvings.
Here are some easy-to-follow sketches (photos and drawings):


One of the most luxurious products, valued for their originality and handicraft, are rightfully considered to be products made in the form of wood carvings. Since ancient times, with the help of this type of art, unsurpassedly decorated towers and huts have been created.
Some of them are currently considered architectural monuments. This art is beginning to revive in the modern world. Wood carving stencils are excellent helpers in this matter.
In contact with
What is a stencil for?
First, let's try to figure out what stencils for woodworking are. These are special ones that are used to apply pattern elements to the surface of wood.
They are much make it easier to repeat identical characters and allow you to speed up your work. For example, the most popular stencils for are samples for platbands.
With their help, quite complex interior and façade design work is carried out.
Stencils are divided according to their purpose for creating interior elements:
- ribbon carved ornament;
- carved platbands;
- pilasters;
- towels;
- carved balusters and more.
All varieties are considered professional templates. You can use them create several ornaments for wood carving of a voluminous nature and significantly facilitate the task assigned to the master. There is no need to create them yourself. On the Internet you can find and download the option you like.
Prices for wood carving kits
wood carving kits
How to choose a stencil
Wood carving designs are so varied that they can be used by both beginners and advanced professionals. With their help, both simple ornaments and high-level works of art are created.

The main thing is to make the right choice. To do this, you must adhere to certain rules:
- if you started using incisors quite recently, then Don’t choose intricate patterns, since it is quite difficult to work with them, and the workpiece can be damaged;
- for each type of wood carving they choose their own stencil;
- Before starting work, you must apply a stencil design to the workpiece; the lines must be neat and clear.
 Finding stencils today is easy. This can be done using electronic libraries.
Every decorator will appreciate the convenience and wide selection of this source. Here you can choose drawings from a bygone era as well as modern masterpieces.
When making a choice, be sure to compare the dimensions of the workpiece and the image itself.
You also need to choose a sample that will look appropriate on an element of the interior. We pay attention to the nuances:
- for a large product, you do not need to choose a stencil with small elements or openwork patterns;
- for small items, stencils with large designs are inappropriate;
- proportions must always be observed.
All these tips apply to any drawings.
Types of wood carving
Wood carving does not have a narrow direction; on the contrary, it has several varieties:
- slotted;
- flat-relief;
- embossed.
Slotted carving on plywood
 The key to success when performing slotted carving is the correct choice of ornament. Thanks to it, plywood carving sets the overall concept and adds aesthetics to the product.
Drawings and ornaments on floral or animal themes are standard representatives of the classical style and are suitable for any interior design.
Very often used slotted inscriptions. In this case, ready-made stencils are difficult to find, since they are created individually for each case. This is due to the fact that it is necessary to maintain the size, style of the font, and the set of words is always different.
Important! The situation is completely different with patterns of plant, animal and fantasy styles. Many options for this topic can be found on the Internet. Some options are shown in the photo below.
House wood carving
Brownie is the main focus of the design of huts, which is very common in the Nizhny Novgorod region. It is she who can boast of various lace patterns. To perform it yourself, you should select the appropriate sketches.
The main condition for house carving is to avoid small parts. They will get lost on the facade of the house, and will not last long.
Options for house carvings can be selected on websites dedicated to wood carvings. But there are craftsmen who can make a template to order. In this case, you can realize exactly your idea and get an original pattern.
Attention! Patterns for house carvings are applied using tape stencils.
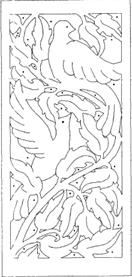
Through wood carving
A distinctive feature of through thread is complete wood removal from the inside of the picture.

Through threads come in different styles:
- simple, in which elements are cut out along the contour of the design;
- openwork, when the pattern is created with a volumetric effect due to multi-level cutting.
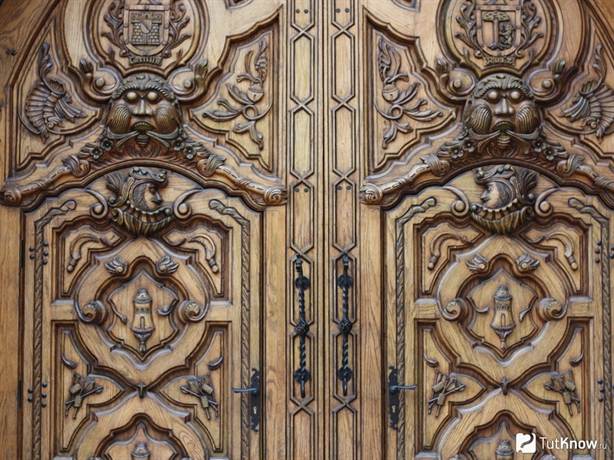
Through carvings are used to make frames, various overlays, door panels, and decoration elements.
Through carving in oriental style is done using a jigsaw.
Sawing with a jigsaw
Sawing with a jigsaw is mainly carried out on plywood. To perform quality work you must have at least the slightest experience with the tool. Also an important factor is the presence of an original stencil depicting animals.

Commonly used stencils:
- a pair of swans;
- head of a deer, wolf;
- cockerels on a knitting needle;
- a horse standing on its hind legs;
- butterflies.
It all depends on the style of the interior, which needs to be supplemented with decorative elements. You can easily find examples of templates on the Internet.
 The most suitable material for sawing is birch plywood 3–10 mm thick. In addition, for work you need to prepare:
- copy paper for interleaving the pattern;
- special paper for sanding parts;
- wood glue for joining parts;
- clear varnish to give a decent appearance.
Before starting work, the workpiece is carefully polished with glass paper, only then do they begin to transfer the design.
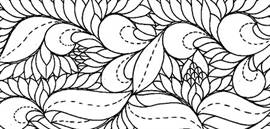
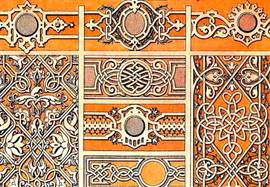
Floral ornament
Often, floral or foliage patterns are made in the form of stripes or borders consisting of repeating patterns. Can be made in an individual composition that contains an image trees, fruiting plants, various floral elements And so on.

The work is done in various ways:
- display in a naturalistic form;
- simplified plant elements.
Floral patterns for carving wood are in second place in popularity after geometric patterns. Favorite thematic elements at all times are lilies, grape leaves and berries, oak, hops, ivy, etc.
Sketches for patterns
Stencils for wood carving are quite diverse in their subject matter. Some of their variants are used in a narrow direction, and some can be found on any interior elements.

Here are several sketch options that can be used for a specific purpose:
- Wooden patterning is used to decorate the facade of houses. It looks perfect on both doors and walls.
- Art style cutting is used to decorate tableware and furniture.
- Products made using intricate openwork cutting are especially held in high esteem. Most often it is used for household items.
Important! A correctly selected sketch will help you complete wood carving quickly and accurately.
Useful video: templates for wood carving
Each type of cutting has its own processing technology, and detailed elements are maintained. In some cases, several techniques are used simultaneously, which are subsequently transformed into a three-dimensional canvas with the presence of smallest fragments. This characterizes a true master.
Artistic wood carving always looks very impressive. Most people have no idea how such products can be made. It seems that this requires enormous physical strength, and in addition, artistic taste and education. However, cutting out a beautiful ornament is not as difficult as it seems, you just need to learn a little technique and, as they say, get better at it. We will show popular drawings for learning wood carving techniques that will be useful for beginners and masters!
It's no secret that for manual creative work it is necessary not only to master the skills of this art, but also to have inspiration, desire and, of course, time. In order for all these parameters to come together, the master can use drawings to study simple wood carving. Not only drawings help to generate an idea, but also photographs of the work of other craftsmen.
There are sketches for different types of wood carving, and here you can find a suitable sketch for yourself completely free of charge.
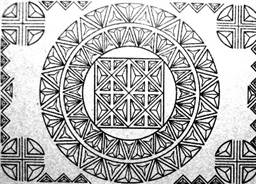
We analyze drawings for wood carving: sketches for geometry
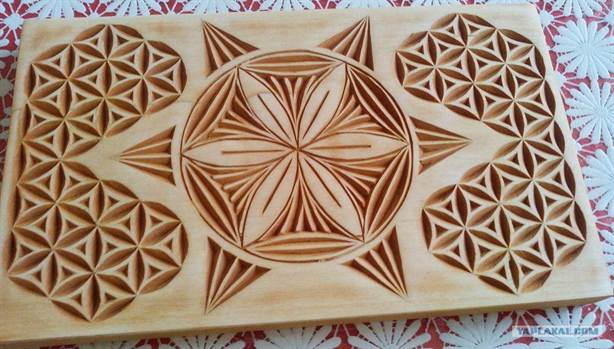
Drawings for geometric carving are well suited for beginning craftsmen. This is an easy and effective type of wood carving. To do this, you just need to determine for yourself which areas are convex and which are concave, in which case the correct picture on the tree will come out.
Boards in geometric and flat-relief techniques.
Stencil.

Stencils can be changed - for example, reducing the number of elements, or, conversely, adding details for a more interesting result.
Stencils for slotted carving.There are other types of artistic carving. One of the simple cutting techniques, provided you have the right tool, such as a router, is slotting. It is also called openwork because the finished product, made accurately and accurately, looks like lace. It has no background - it is cut out of the pattern. Hence the name. To practice this type of wood carving, you need to have a steady hand and cut clearly along the contour of the stencil. A contrasting color of fabric or foil is placed under a product made using this technique with a router or jigsaw. The photo shows examples of finished work, as well as sketches suitable for this technique.

Contour carving is different in that a contour pattern is cut out on the wood. You can make a lot of different paintings using this technique; it is not necessary to take a ready-made stencil for carving. To decorate a nursery, you can circle the coloring book and use it as a sketch. Also, if you don’t know how to draw, you can take any sketch made in pencil and transfer it to wood. This technique produces good images of animals, birds, as well as landscapes and still lifes. The images clearly show examples of what can be carved on wood using this technique.

Black varnish carving is a type of contour carving, where a light contour is cut out on painted wood.
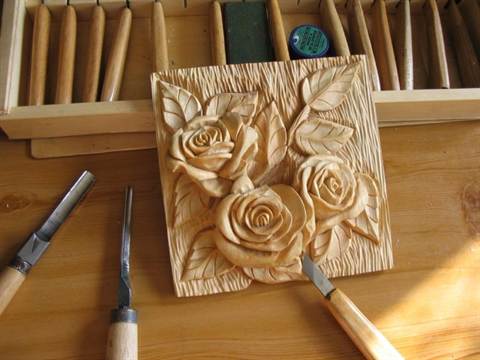
Examples and stencils for flat-relief wood carving.This type is different in that the drawing is above the background. In this case, the pattern has the same height. The background can be textured or smooth. The edges of the cut out pattern are usually rolled over, that is, it is carefully sanded so that they are smooth, as if oval. This technique requires a little more skill than others, but the products made this way look amazing. The photo shows examples and sketches for carving in this style.

Drawings for boxes can be distinguished as a special type. They can be made using various techniques: slotted carving, placing a base of fabric, foil or noble types of wood of a suitable color under the design; flat carving, which includes geometric and contour, or another subspecies. It differs in that indentations of the same depth are made in a flat background. In the case of geometric techniques, the recesses, as a rule, have the shape of triangles or quadrangles. In addition, there is also a staple carving, which is also a type of flat carving and is well suited for decorating boxes. In the images you can see boxes made in various styles.
Wood carving for beginners is an interesting and exciting activity that is not particularly difficult. It is not necessary to have artistic skills to create ornaments and patterns. Now ready-made sketches and video tutorials come to the aid of a beginner.


Most even accomplished masters are inspired by the work of other people, so be sure to carefully look at the stencils, diagrams and drawings of other amateurs.
Types of techniques
Sculptural carving is the most complex, requiring certain skills. There are many books on this technique.

The incised carving features a fully processed background and beautiful ornamentation. It is performed with a jigsaw, knife, and finishing can be done with a chainsaw.
Geometric carving will help you learn the technique.
In order to perform artistic carving, it is easier to copy a ready-made sketch than to create your own.
But most ready-made patterns are distinguished by a certain intricacy, so a novice master can try his hand at creating his own simple sketch.

Creating a Sketch
When designing a sketch you need to perform the following sequence of steps:
- The workpiece for work is selected;
- The sketch indicates the main elements and places where the thread will be applied;

- Using drawing supplies, the picture is redrawn onto graph paper or tracing paper with scale markings;
- If any elements are repeated, then creating a single stencil is sufficient.
If you have the skills to work in simple graphic editors (for example, Paint), you can create a sketch there and then simply print it on paper to the required scale.
Stencils are usually used repeatedly, so it is advisable to make them from a relatively dense material (cardboard, plywood).
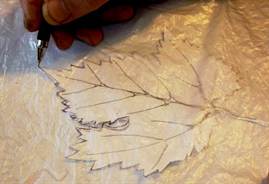
Here are some details of transferring the design from the template to the tree:
- The sample is fixed directly to the base with a milling cutter, cutting is carried out directly along its contour;
- The contours of the stencils are transferred to the wood with a simple pencil;
- You can transfer a sketch from paper to a board by placing tracing paper underneath it. After drawing the outline of the sketch, a trace from the carbon paper will remain on the wood;

- The simplest patterns can be transferred using pricking (with a needle, knife or awl).

Stages of work
When the sketch is transferred to the base, the most interesting process begins - the actual processing of the wood.
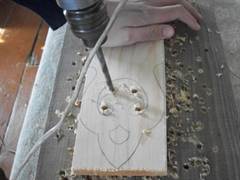
If you are working using the through-thread technique, the first step is to make starting holes in each element. This is usually done using an electric drill. A saw is then inserted into the holes and part of the wood is sawed out. Next, the edges are aligned and the decoration begins.
Flat-relief and volumetric carvings are performed a little differently.

First, the contours of future patterns are made with a knife. Next, the cutter cuts through the deepest central part. All other recesses are formed from it.
Small details are made using a chisel.
Sometimes additional tools may be required (such as a mallet for harder woods).

Deep relief is made with a chisel with a curved blade. Upon completion of the work, all edges are processed to eliminate roughness and chips.


Artistic wood carving always looks very impressive. Most people have no idea how such products can be made. It seems that this requires enormous physical strength, and in addition, artistic taste and education. However, cutting out a beautiful ornament is not as difficult as it seems, you just need to learn a little technique and, as they say, get better at it. We will show popular drawings for learning wood carving techniques that will be useful for beginners and masters!
It's no secret that for manual creative work it is necessary not only to master the skills of this art, but also to have inspiration, desire and, of course, time. In order for all these parameters to come together, the master can use drawings to study simple wood carving. Not only drawings help to generate an idea, but also photographs of the work of other craftsmen.
There are sketches for different types of wood carving, and here you can find a suitable sketch for yourself completely free of charge.
We analyze drawings for wood carving: sketches for geometry
Drawings for geometric carving are well suited for beginning craftsmen. This is an easy and effective type of wood carving. To do this, you just need to determine for yourself which areas are convex and which are concave, in which case the correct picture on the tree will come out.
Boards in geometric and flat-relief techniques.
Stencil.

Stencils can be changed - for example, reducing the number of elements, or, conversely, adding details for a more interesting result.
Stencils for slotted carving.There are other types of artistic carving. One of the simple cutting techniques, provided you have the right tool, such as a router, is slotting. It is also called openwork because the finished product, made accurately and accurately, looks like lace. It has no background - it is cut out of the pattern. Hence the name. To practice this type of wood carving, you need to have a steady hand and cut clearly along the contour of the stencil. A contrasting color of fabric or foil is placed under a product made using this technique with a router or jigsaw. The photo shows examples of finished work, as well as sketches suitable for this technique.

Contour carving is different in that a contour pattern is cut out on the wood. You can make a lot of different paintings using this technique; it is not necessary to take a ready-made stencil for carving. To decorate a nursery, you can circle the coloring book and use it as a sketch. Also, if you don’t know how to draw, you can take any sketch made in pencil and transfer it to wood. This technique produces good images of animals, birds, as well as landscapes and still lifes. The images clearly show examples of what can be carved on wood using this technique.

Black varnish carving is a type of contour carving, where a light contour is cut out on painted wood.
Examples and stencils for flat-relief wood carving.This type is different in that the drawing is above the background. In this case, the pattern has the same height. The background can be textured or smooth. The edges of the cut out pattern are usually rolled over, that is, it is carefully sanded so that they are smooth, as if oval. This technique requires a little more skill than others, but the products made this way look amazing. The photo shows examples and sketches for carving in this style.
Drawings for boxes can be distinguished as a special type. They can be made using various techniques: slotted carving, placing a base of fabric, foil or noble types of wood of a suitable color under the design; flat carving, which includes geometric and contour, or another subspecies. It differs in that indentations of the same depth are made in a flat background. In the case of geometric techniques, the recesses, as a rule, have the shape of triangles or quadrangles. In addition, there is also a staple carving, which is also a type of flat carving and is well suited for decorating boxes. In the images you can see boxes made in various styles.